
Can you make a UGC video ad for your product with AI? Without hiring an actor or filming it yourself? Yes. Plenty of DTC brands already do it every day.
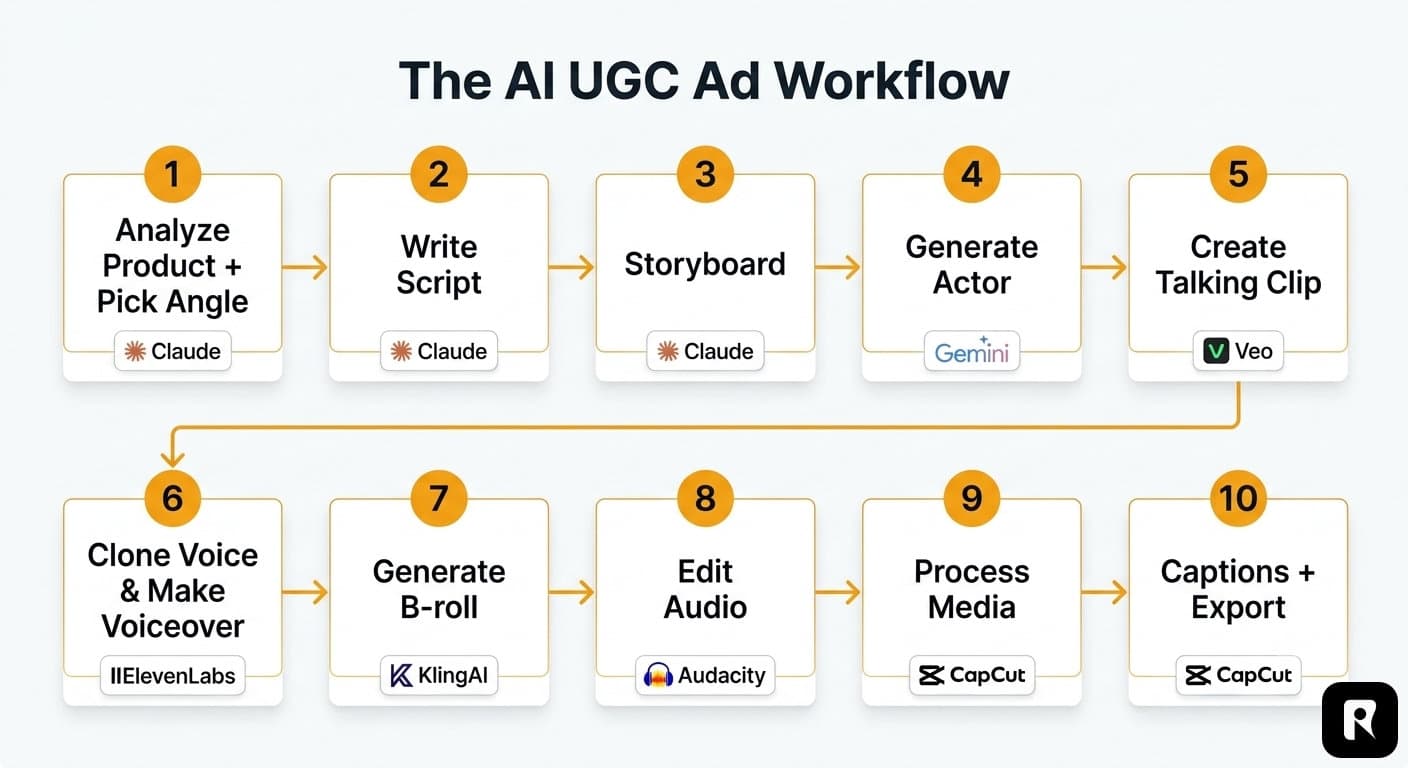
Here is what most tutorials leave out: the difference between an AI UGC ad that converts and one that screams "AI" is not the tools. It is a set of quality standards applied at every step: product accuracy, face consistency, voice continuity, timing discipline. Unless you're using a specialised platform, hitting that bar takes about seven tools working together. One writes the script. One generates your creator. One turns stills into video. One handles the voice. One puts it all together.
This guide walks through the whole process in order, with the quality checkpoint for each step and a real running example: a cordyceps supplement from a small e-commerce brand. Follow it end to end and you'll have a finished vertical ad, and a repeatable standard for every ad after it.
TL;DR: To make an AI UGC ad, you will analyze your product and pick an angle, write a script, storyboard it into scenes, generate an AI creator, film them with an AI video model, clone the voice and generate a voiceover, generate product b-roll, match the audio, then assemble, caption, and export. That is about 7 tools and half a day of work. At the end of this guide, we also cover a simpler alternative that does all of this in one flow.
Your progress checklist
0 / 30 doneEach step below ends with a short checklist. Tick items off as you go to keep your place — your progress is saved on this device.
- Step 1 · Analyze your product & pick your angle
- Step 2 · Write the script
- Step 3 · Storyboard it into scenes
- Step 4 · Cast your creator
- Step 5 · Generate the talking clips
- Step 6 · Clone the voice & make the voiceover
- Step 7 · Generate the product b-roll
- Step 8 · Match & clean the audio
- Step 9 · Assemble in CapCut
- Step 10 · Captions, music & export
What Is an AI UGC Ad (And Why DTC Brands Want Them)
UGC stands for user-generated content. It is the casual, phone-shot style where a real person talks to the camera about a product. It dominates TikTok, Reels, and Shorts. It does not look like an ad, and that is exactly why it works.
For a DTC brand, UGC ads are the workhorse creative. They are cheap to test, they feel authentic, and the format is proven. It consistently ranks among the best-converting video ad formats on paid social. The hard part has always been supply. You need creators, briefs, shipped product, revision rounds, and usage rights. AI UGC ads remove all of that. You generate the creator, the voice, and the footage yourself.
Here is the whole process, one step at a time.
How to Make an AI UGC Video Ad in 10 Steps
Step 1: Analyze Your Product and Pick Your Angle
Before you write a single word, describe your product the way a camera sees it, not the way your brand deck describes it.
This is a job for an LLM. In this example I am using Claude. First I upload 2 high-quality photos of the product, showing the bottle, the label, and the gummies. Then I ask it to describe the product for an ad. You want the category, the container type, the exact colors, the finish, the material, and any text on the label. The result is a plain-English visual profile of your product. Save it. Every AI tool downstream is guessing what your product looks like, and this description keeps your product looking consistent across all scenes.
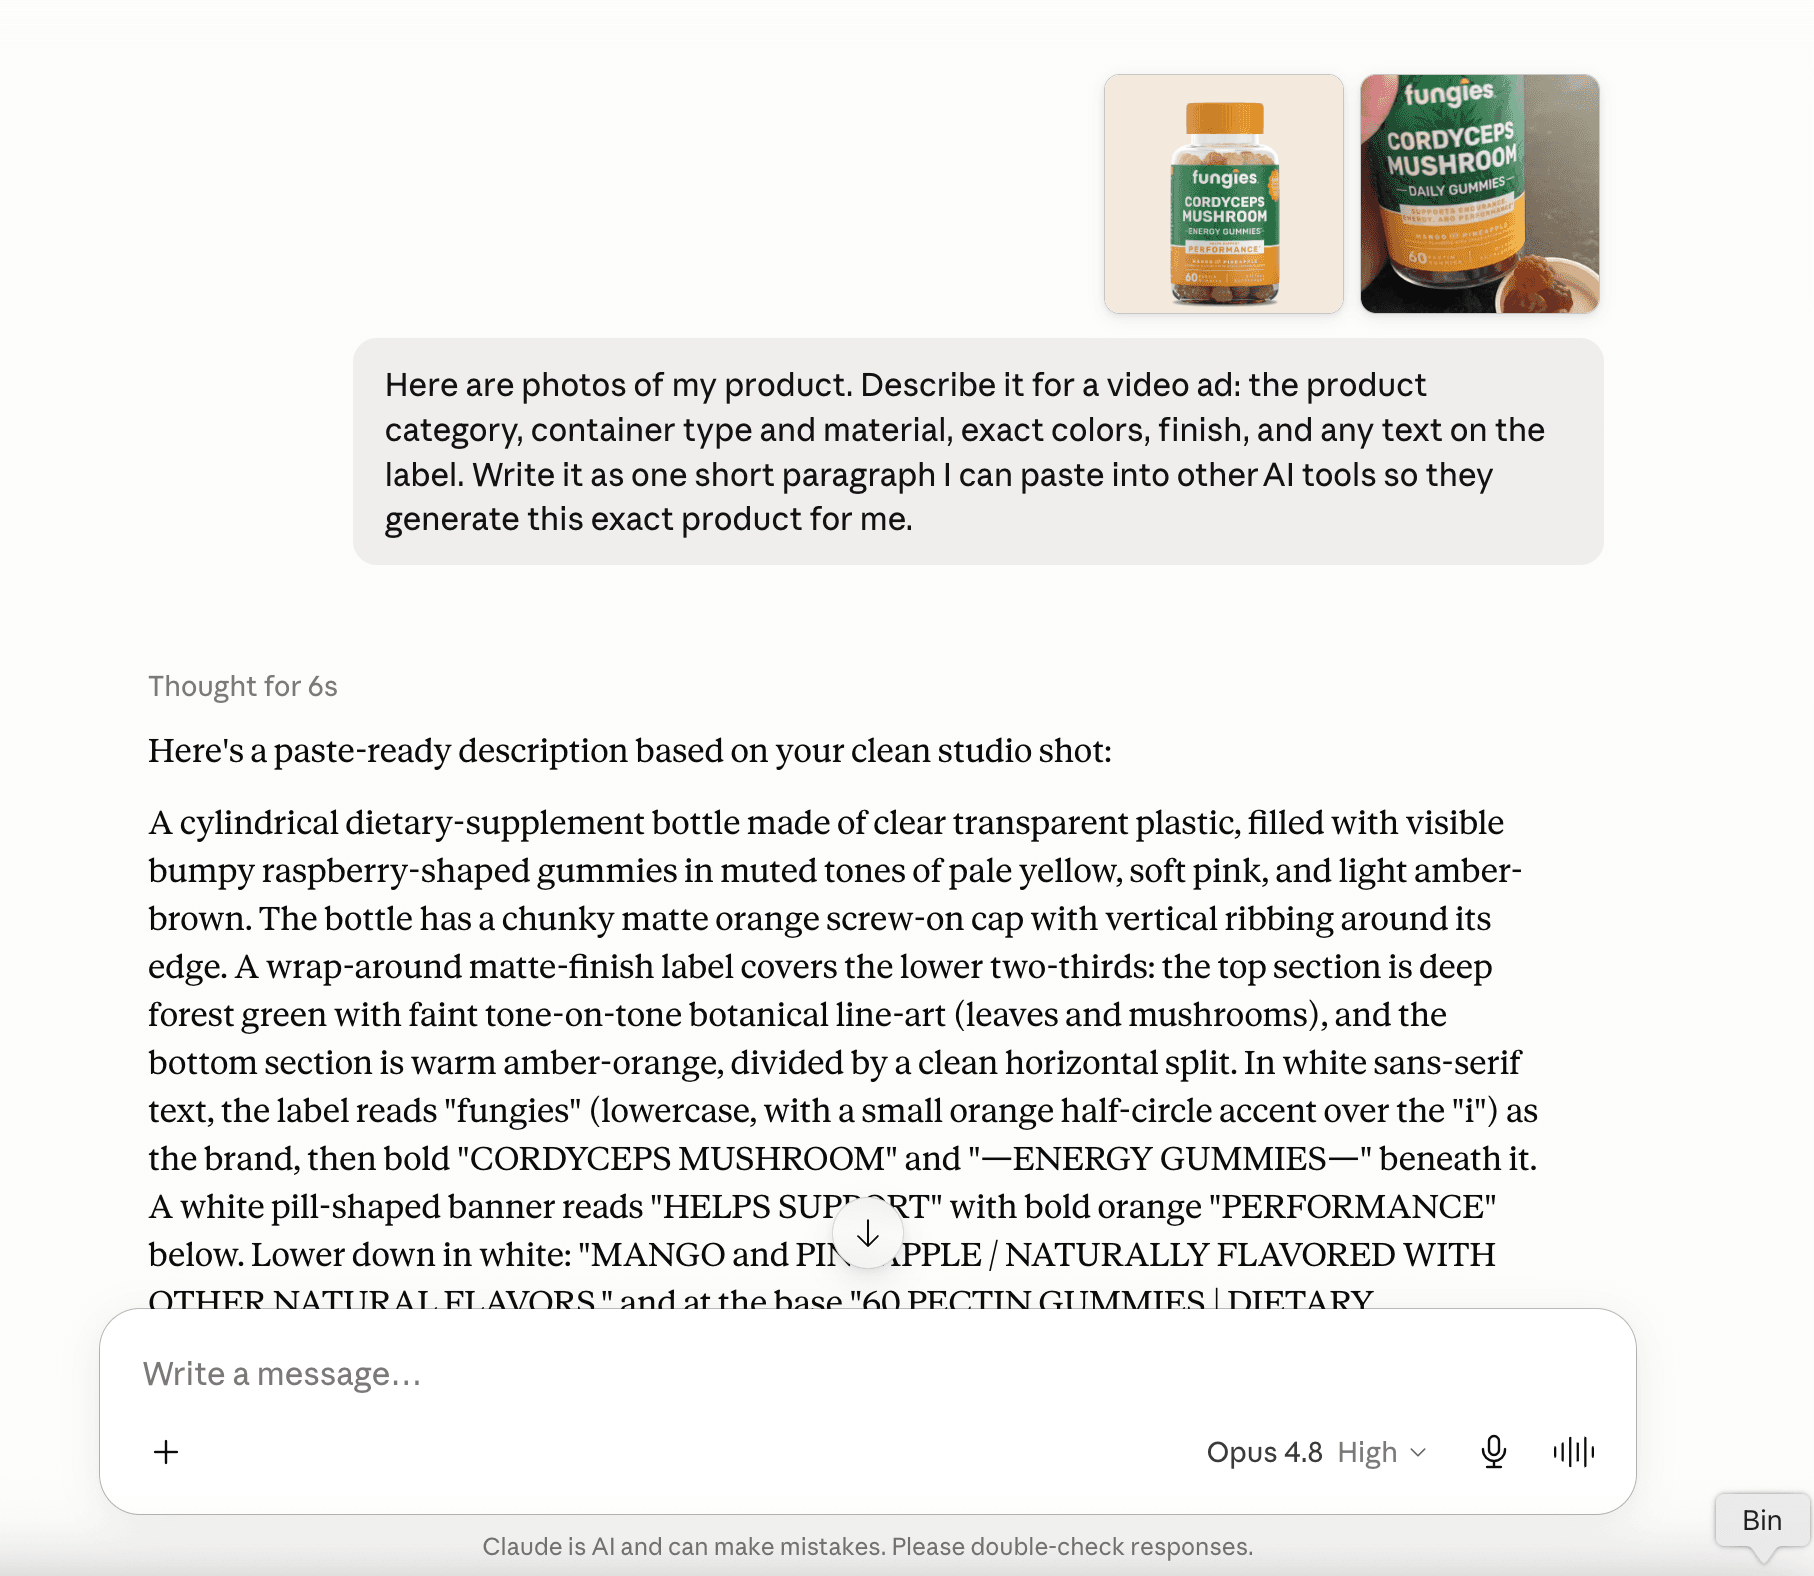
Here are 2 photos of my product. Describe it for a video ad: the product category, container type and material, exact colors, finish, and any text on the label. Write it as one short paragraph I can paste into other AI tools so they generate this exact product for me.
Next, pick your angle. An angle is the story your ad tells. You do not need to invent one. Pick from the frameworks that have worked in UGC for years:
- Problem → Solution. Name a pain, then reveal the product as the fix.
- Testimonial / Review. A happy customer vouching for the product.
- Before → After. Show the transformation.
- Storytime. “So this happened to me…” and the product enters the story naturally.
Ask the same chat which angle fits your product, your audience, and your goal, and have it explain why. For a supplement aimed at people with low energy, Before → After or Problem → Solution usually wins. Pick one that you find the most fitting.
My product: [paste your product description]. My audience: individuals seeking natural energy support, improved workout performance, and enhanced daily vitality. My goal: direct purchase. Which UGC ad angle fits best: Problem to Solution, Testimonial, Before and After, or Storytime? Pick one and explain why in 2 sentences.
One last note before you move on: the format. UGC lives vertically, so everything you generate will be 9:16. That covers TikTok, Reels, and Shorts. The look should be casual and slightly imperfect, like it was filmed on a phone, not a polished commercial. Keep a style line handy and paste it into every generation prompt from here on:
Vertical 9:16 video, 1080x1920. Casual UGC style, filmed on a phone, natural lighting, slightly imperfect. Not a polished commercial.
Step 2: Write the Script
Now the words. Back in the Claude chat, paste your product profile and your chosen angle. Ask for a short spoken script, the kind a creator would say straight to camera. Aim for about 500 characters.
Write a 30-second spoken UGC ad script for this product: [paste your product description]. Angle: Problem to Solution. Structure: hook (first 3 seconds), agitate, reveal, proof, call to action. About 80 words total. Casual, like a friend talking to the camera. No hashtags, no emojis.
A UGC script follows a simple beat structure:
- Hook (first 3 seconds). Stop the scroll. A bold claim, a relatable frustration, a question.
- Agitate / Story. Make the pain vivid or set the scene.
- Reveal. Introduce the product.
- Proof. Why it works, what changed.
- Call to action. Tell them what to do next.
Keep it tight: 15 to 30 seconds of speech, which is roughly 40 to 80 words. Read it out loud. If you stumble, cut it. For a deeper look at each beat, with full script examples by ad goal, see our complete UGC ad script guide. And if the hook is where you get stuck, borrow from these 47 viral hook ideas.
Free UGC Script Generator
Want a head start on this step? Describe your product and get a complete, beat-structured UGC ad script in seconds.
Try it free →Step 3: Storyboard It into Scenes
Your ad is not one clip. It is a sequence of short shots, each a few seconds long. Break the script into scenes and decide three things for each one:
- Who is on screen? Your creator talking to camera, or the product on its own (b-roll)?
- Which words from the script play over this shot?
- How long is it?
A structure that works well: talking-head hook, product shot for the reveal, faceless product b-roll for the results, product shot for the CTA. Ask your AI chat to draft this split for you, then check it yourself.
Split this script into 4 scenes: [paste your script]. For each scene give me: shot type (talking head or product b-roll), a short visual description, the exact words spoken over it, and the duration in seconds. The durations must add up to 30 seconds. Return it as a list.
One rule to follow carefully: the timing has to add up. If your voiceover is 30 seconds, your scenes must total 30 seconds, with no gaps and no overlaps. Keep a simple table of scene, shot type, words, and duration. It becomes your map for every step that follows.
Fungies Cordyceps Video Ad — Scene Breakdown

Scene 1: Hook
Type: Talking head
Duration: 12 seconds
Description: Tight selfie cuts in kitchen showing frustration — rapid cuts on speech, eyebrows pinched, hand gestures, defeated shoulder shrug. No pauses between clips.
Voiceover: "I was so tired of hitting that 2pm wall every single day. I tried extra espresso shots, pre-workouts loaded with junk, but ended with just jitters and a harder crash. I was about to give up."

Scene 2: Product Shot — Intro
Type: Product b-roll (in hand)
Duration: 9 seconds
Description: Bright living room, woman at mid-chest level holds bottle on open palm. Lifts bottle toward camera with confident nod. Clean, no filter, handheld phone video feel.
Voiceover: "Then my training partner swapped his pre-workout for Fungies Cordyceps Gummies and I thought he was crazy, until I tried them myself."

Scene 3: Product Shot — POV/Results
Type: Product b-roll (faceless)
Duration: 6 seconds
Description: Top-down kitchen counter POV. Hand picks up bottle, lifts it toward camera, sets it back down. Water glass nearby. Handheld, no face visible.
Voiceover: "Within a week, my afternoon crashes disappeared and I added twenty extra minutes of intensity at the gym."

Scene 4: Product Shot — CTA
Type: Product b-roll (in hand)
Duration: 3 seconds
Description: Home hallway, natural side light. Woman presents bottle at chest level two-handed, confident smile, nod with raised eyebrows. Handheld phone video.
Voiceover: "Link's below, honestly just try them."
Step 4: Cast Your Creator (Generate the Actor Image)
Time to make your representative person. You will generate a still photo of a realistic creator first, because video tools work best when you hand them a starting frame.
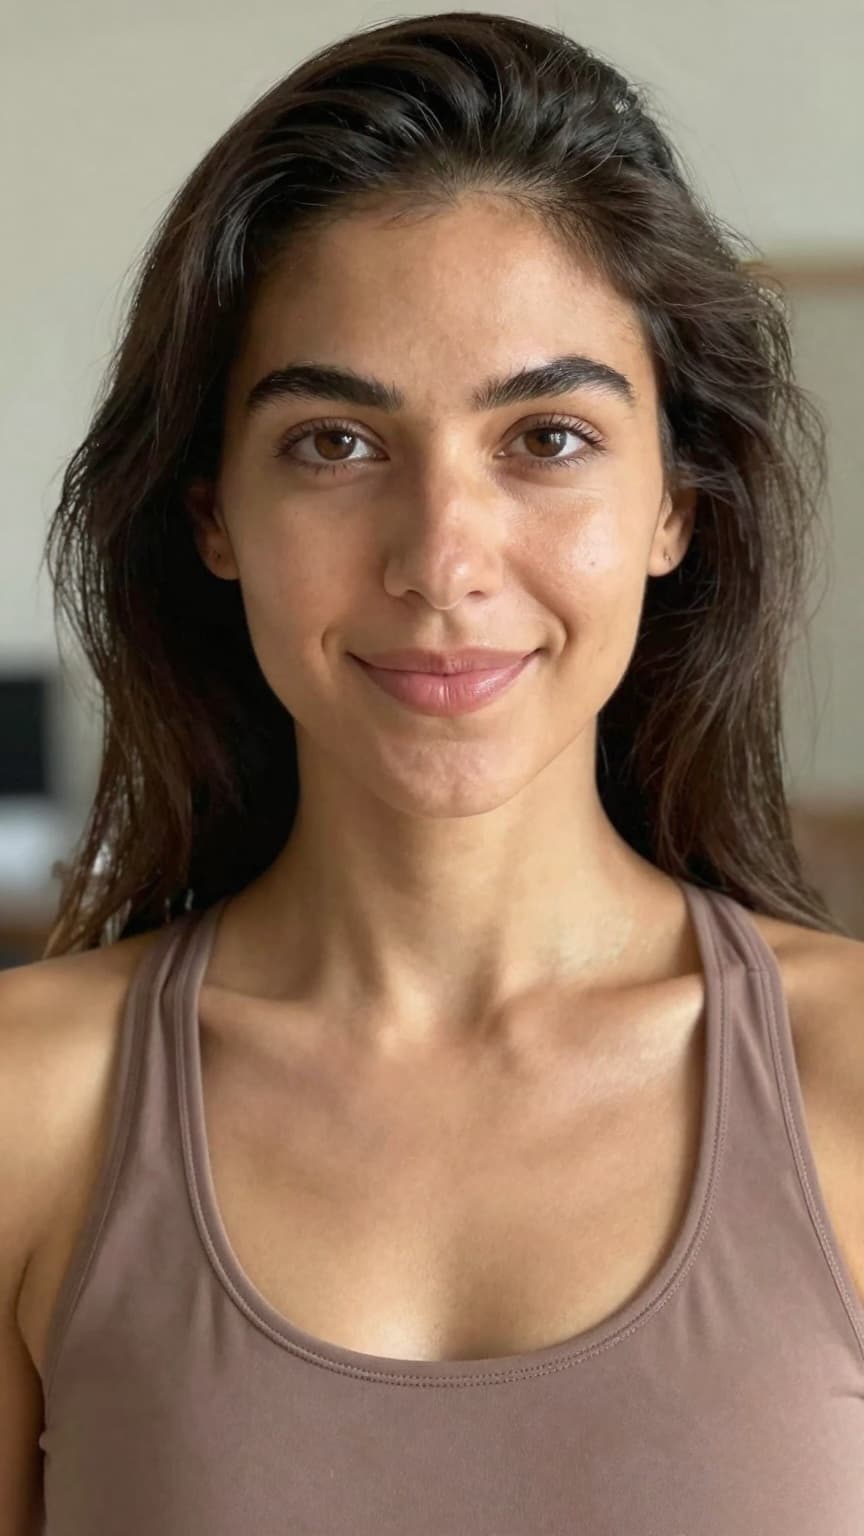
Open Google's Gemini image tool (the image model nicknamed “Nano Banana”) and prompt a photorealistic portrait of your creator. Describe the age, look, setting, and lighting. Aim for someone your audience would trust, with a natural phone-selfie feel rather than a studio headshot.
29-year-old female, light olive skin, warm golden undertone, athletic muscular build, strong physique, fit build, Latino/Hispanic ethnicity, medium textured dark brown hair, with facial features: warm brown eyes, natural smile lines; wearing an athletic outfit, in a home setting
Save this image. Every scene with your creator needs to show the same face, so you will reuse this portrait for the rest of the project.
Step 5: Generate the Talking Clip
Now bring the creator to life. Take your portrait into an image-to-video model. Google Veo via Flow and Grok Imagine both do this well. Generate a clip of your creator talking to camera, delivering your hook line.
The woman in this photo talks directly to the camera, natural head movement and blinking, casual and friendly, like she is filming herself on her phone. She says: 'I was so tired of hitting that 2pm wall every single day. I tried extra espresso shots, pre-workouts loaded with junk, but ended with just jitters and a harder crash. I was about to give up.' Keep her face exactly as in the photo. Vertical 9:16.
Three things to know before you start:
- These tools generate short clips, usually 5 to 12 seconds. Make the spoken line fit the scene duration exactly. If the line is too short for the clip, the model will hallucinate nonsense to fill the time.
- It is normal for a generation to miss or contain artifacts you do not like. Plan for a few re-generations per scene.
- Use a model that generates its own spoken audio with the clip. The lip sync is much better than trying to fit separate audio onto a mouth later, and this voice becomes the base for the voiceover in the next step.
Generate your talking scenes, download and label them so your project stays organized.
Step 6: Clone the Voice and Generate the Voiceover
Your talking clips cover the on-camera moments. Your b-roll shots still need a voice, and the whole ad should sound like one consistent person from start to finish.
The trick is to clone the voice from your talking clip. Go to ElevenLabs, open voice cloning, and upload the audio from your best talking clip. A clean sample of 10 to 20 seconds is enough for an instant clone.
Then paste your script and generate the full voiceover as a single audio file in the cloned voice. This becomes your master voice track. Because it is cloned from the clip, it sounds like the same person the viewers see on camera.
Step 7: Generate the Product B-Roll
Back to video, this time for the shots with the product: the bottle in the actress's hand, and the bottle of supplements on the kitchen counter being picked up by the actress.
Video models make much better product shots when you give them a starting frame. So first, go back into Gemini and generate a clean product still. Use your visual profile from Step 1 and make sure to include the photo of your product there. Then take that still into Kling AI and use image-to-video to add motion: a slow push-in, a hand picking it up, the actress holding the bottle.
Clean photo of [paste your product description] standing on a kitchen counter, soft morning light from a window. Shot on a phone. Vertical 9:16.
Bright living room, woman at mid-chest level holds bottle on open palm. Lifts bottle toward camera with confident nod. Clean, no filter, handheld phone video feel.
The rhythm is the same as Step 5. Generate each b-roll scene, check that the product still looks like your product, download, and label.
Step 8: Match and Clean the Audio
Most tutorials skip this step. It is the one that makes your ad sound professional.
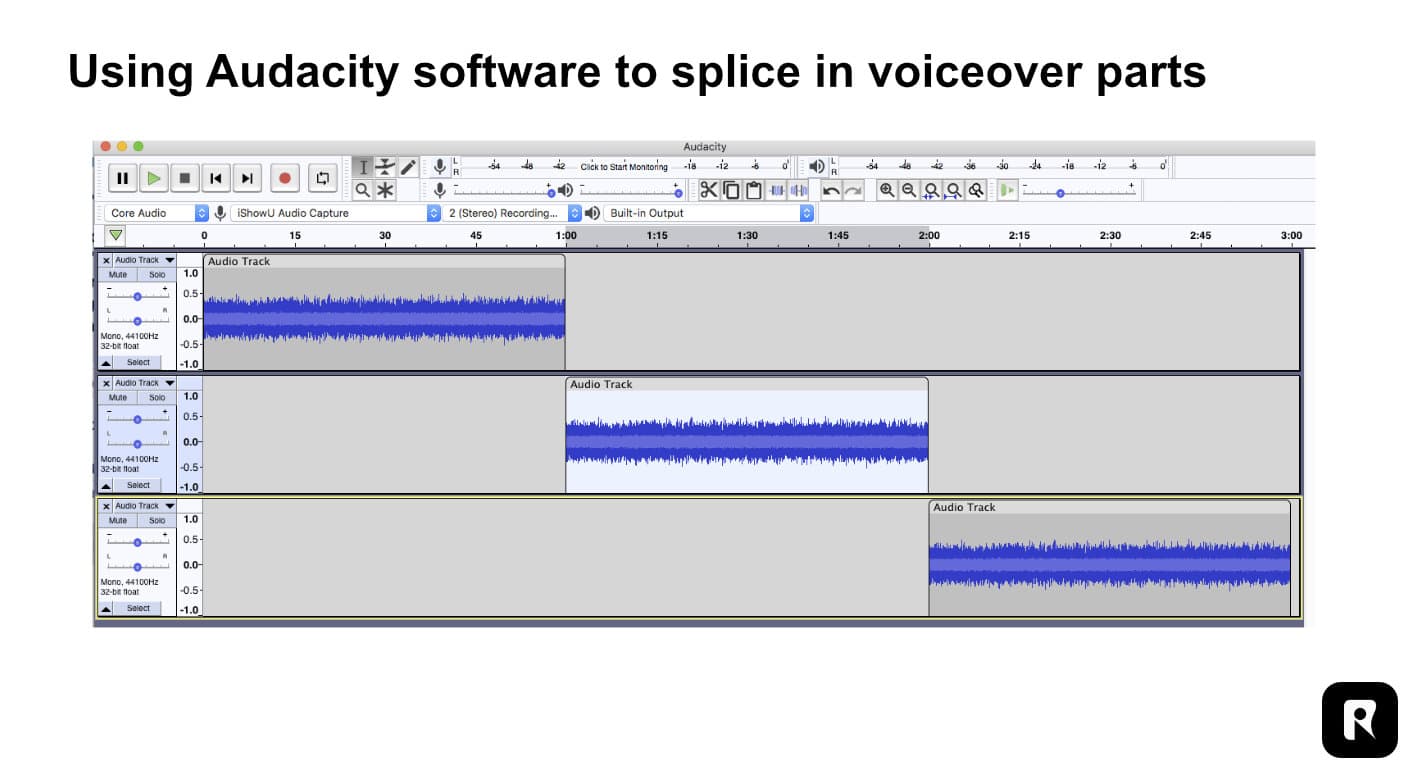
You now have a master voiceover from Step 6 and talking clips with their own built-in audio from Step 5. Thanks to the voice clone, the tone already matches. Your job here is clean joins. Open a free audio editor like Audacity and do three things:
- Cut the silences and dead air out of the raw voiceover so the pacing feels natural.
- Splice the talking clip audio and the master voiceover together at clean word boundaries, so the handoff between on-camera speech and voiceover is smooth.
- Check the timing against the storyboard table from Step 3, so the joined track still lines up.
This takes some patience the first time. It gets faster with every ad, and it is the difference between an ad that feels like one person and one that feels stitched together.
Step 9: Assemble in CapCut
Now everything comes together. Open CapCut, set the project to 9:16, and build your timeline:
- Drop each video clip onto the timeline in scene order, at the durations from your storyboard.
- Lay your matched master voiceover across the top so it plays over the whole ad.
- Mute the individual clip audio where needed, so only your clean voice track is heard.
- Add light transitions between scenes so the cuts feel intentional.
This is where your timing table from Step 3 pays off. If a generated clip came out a second short, you will see it here and can nudge the cuts to keep the voice in sync.
Step 10: Captions, Music, and Export
Most people watch UGC ads on mute, so captions are part of the ad, not an extra.
In CapCut, run auto-captions to transcribe your voiceover into word-by-word, TikTok-style text. Fix any wrong words and nudge the timing so each word highlights as it is spoken. Style them big, bold, and centered. Make sure the captions are placed within the "Safe Zone." Keep your text strictly in the middle third of the screen—avoiding the top 250 pixels, the bottom quarter of the frame, and the extreme left/right edges.
Optionally, you can add a subtle track from CapCut's music library if it fits the tone of your video.
When everything looks right, export at 1080×1920, H.264. Watch it once like a customer would, fix anything that feels off, and you have your first AI UGC ad. For variations, swap the hook or the angle from Step 1 and rerun the affected steps.
For TikTok specifically, Flowjam's guide to making a TikTok ad with AI covers hook-first scripting, captions and Spark Ads.
Here is the ad this guide produced, start to finish:
What to Expect: Time, Tools, and Skills
Here is a realistic picture of the manual workflow, so you can plan your first ad properly:
| Making AI UGC ads by hand | |
|---|---|
| Tools you sign up for | ~7 (Claude, Gemini, Veo/Grok, ElevenLabs, Kling, Audacity, CapCut) |
| Subscriptions | 4 to 5 paid plans |
| Skills you practice | Copywriting, prompting, video editing, light audio editing |
| Time for one polished ad | Half a day, once you know the ropes |
| Time for 10 variations | Plan for about a week |
Each step is simple on its own. The real skill you are building is consistency: one face, one voice, one timeline, carried across seven tools. Keep your visual profile, your creator portrait, and your timing table close, and the process stays under control.
A Simpler Way to Make AI UGC Ads
If you would rather skip the tool juggling, you can run this whole workflow in one place. Tools like Retiplex handle every step in this guide in a single flow: the script, the AI creator, the voiceover, the b-roll, the audio matching, the assembly, and the captions. You upload your product photos and get back a finished vertical ad, with the face, voice, and timing kept consistent for you.
Both paths work. Building ads by hand gives you full control and teaches you the craft. The all-in-one flow gets you to testing faster. Pick the one that fits your team and your timeline.
All 10 steps automated: from product to ready-to-post video
Retiplex Ad Engine handles the full ad creation for you: optimal ad angle, scriptwriting, tailored actor, the voiceover, the talking scenes, the b-roll, and the full assembly you just read about. All done within a few clicks.
Get your first video freeIncludes 1 free video and 150 credits. No credit card required.
AI UGC Ads: Frequently Asked Questions
What tools do I need to make an AI UGC video ad manually?
At minimum: an AI chat tool for product analysis and scripting (Claude), an image generator for your creator and product stills (Gemini), an image-to-video model for talking clips and b-roll (Veo/Grok and Kling), a voice cloning tool (ElevenLabs), an audio editor (Audacity), and a video editor (CapCut). Or one platform that does all of it in a single flow.
How much does it cost to make AI UGC ads?
Doing it by hand, budget for 4 to 5 separate subscriptions, most in the $10 to $30 per month range, plus per-generation credits on the video tools. Plan around how many variations you want to test. For a full cost breakdown, see our analysis of AI vs traditional video ad ROI.
How long should a UGC ad be?
For TikTok, Reels, and Shorts, aim for 15 to 30 seconds. Shorter hooks tend to test better. Get to the point fast.
Do I need a real product photo?
It helps a lot. Feeding real photos into your image and video tools keeps the generated product true to what you actually sell, instead of an AI's invented version.
Is it better to use one AI UGC tool or stitch tools together?
Stitching tools together gives you maximum control and teaches you the craft, but it costs real time. An all-in-one flow like Retiplex trades a little of that control for speed: it keeps the face, voice, and product consistent for you. It turns a half-day of tool-juggling into a ready-to-post video ads made within few clicks and minutes. For most brands running paid social, that turnaround is what matters most.